

How a professional loudspeaker is designed: from concept to production
How a professional loudspeaker is actually designed, no magic, no secret tricks. This article walks through the full process: defining the need, choosing drivers, running simulations, prototyping, tuning the DSP, and preparing for production. A clear, realistic look at every step, and how to avoid the usual mistakes.
ARTICLES
12/2/20252 min read
Speaker design is often presented online as some kind of mystical art:
a mix of “secret recipes”, intuition, and sound magic.
In reality, designing a loudspeaker is first and foremost an industrial process, with clear stages, trade-offs, constraints, and a method. No magic, just rigorous work and lots of iterations.
Today I’ll show you, in a condensed way, how I develop a professional loudspeaker, from the initial idea to the start of production.
It’s not the only possible method, but it’s the one that lets me avoid 95% of the usual traps: pointless back-and-forth, blown budgets, failed prototypes, exploded timelines…
1 — Framing the need (the most important phase)
Before talking about acoustics, you have to define the real objective of the product:
Budget (per unit, tooling, development)
Quantities (proto, pre-series, annual volumes)
Schedule
Product type (audiophile, party, pro, embedded…)
Size constraints, materials, standards, possible IP
Use case (outdoor, indoor, listening distance, power supply, thermal environment…)
Desired industrial design
Client capabilities (who approves what? who sources? who handles electronics?)
At this stage, no precise acoustic target is defined.
We’re setting the playing field. Performance comes afterwards.
2 — Acoustic specifications
We translate the need into realistic target values:
sensitivity
max SPL
directivity
frequency response
available power
DSP constraints (IIR, FIR, limiters…)
We set priorities: what matters most?
A party speaker is not optimized like an audiophile speaker, even though both “produce sound”.
3 — Driver selection & first simulation
We select several candidate woofers/tweeters based on:
T/S parameters
sensitivity
Xmax
power handling
supplier availability
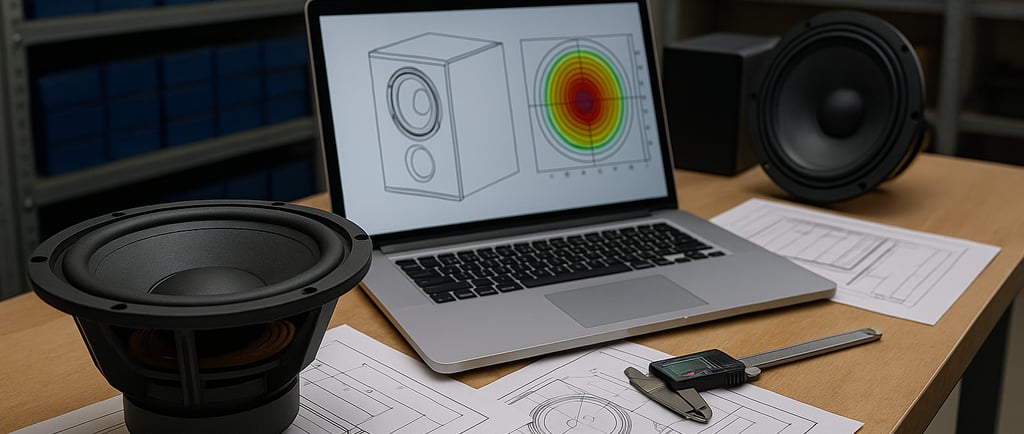
Then we run an initial sizing with Python scripts and simplified simulation without CAD to validate:
enclosure volume
ports / horns
predicted frequency response
approximate directivity
cone excursion at Pmax
air speed in the port
group delay
This step is used to eliminate bad options before going deeper.
4 — Electronics & budget
We choose the electronic architecture:
amplifier
DSP
Passive crossover
This allows us to build a realistic BOM and check:
voltage / current compatibility
headroom
distortion
thermal dissipation
DSP ↔ amplifier compatibility
Then we contact suppliers to confirm prices, MOQ, lead times, component lifecycle.
If the budget explodes here → we adjust now, not at the prototype stage.
5 — Industrial design (draft)
Now that the proportions are set, we validate:
visual identity
ergonomics
usage logic
Goal: make sure everyone sees the same product before we dive into heavy simulations.
6 — CAD + advanced acoustic simulation (BEM)
We move to functional CAD and simulate:
diffraction
real directivity
baffle/driver interaction
behavior of ports/openings
impact of design on response
CAD ↔ BEM → iterations until we get a model that meets the acoustic spec.
7 — FEM simulation
We check that the enclosure doesn’t “sing”:
vibration modes
panel stiffness
required bracing
mechanical behavior vs. useful bandwidth
If the structure vibrates in the wrong region, no amount of EQ will fix it.
8 — Prototype + real measurements
Quick proto (3D printing, CNC, etc.) to validate in real life:
actual SPL
sensitivity
directivity
distortion
port compression
thermal compression
unmodeled resonances
This is where the numerical models meet reality.
9 — DSP / active filter design
We set up:
crossover
EQ
limiters
delays
gains
psychoacoustic corrections
Lots of back-and-forth between measurement, listening, and fine-tuning.
10 — Industrialization (DFM), factory, and production
We prepare production-oriented CAD:
material choices
ribs
inserts
tolerances
injection angles
assembly sequence
Then:
Manufacturer sourcing
Factory prototype (aesthetic, mechanical, acoustic, quality validation)
Final optimizations
Production launch + first-batch control
Conclusion
Designing a loudspeaker is not just “pick a driver and build a box”.
It’s a full industrial project, with trade-offs, simulations, tests, and above all a method to avoid the usual pitfalls.
The version above is intentionally condensed.
If you’d like the full, detailed workflow with each step broken down, I can share it — send me a message or an email.